Snare Drum Tunage
This video is an in-depth response to the folks who have been asking me how I tune snare drums. Packed with a good bit of info it is useful for anyone really wanting to understand how to get great snare drum sound. Tuning is HUGE… but stick with me to the end to see how tuning can only take you so far…..!
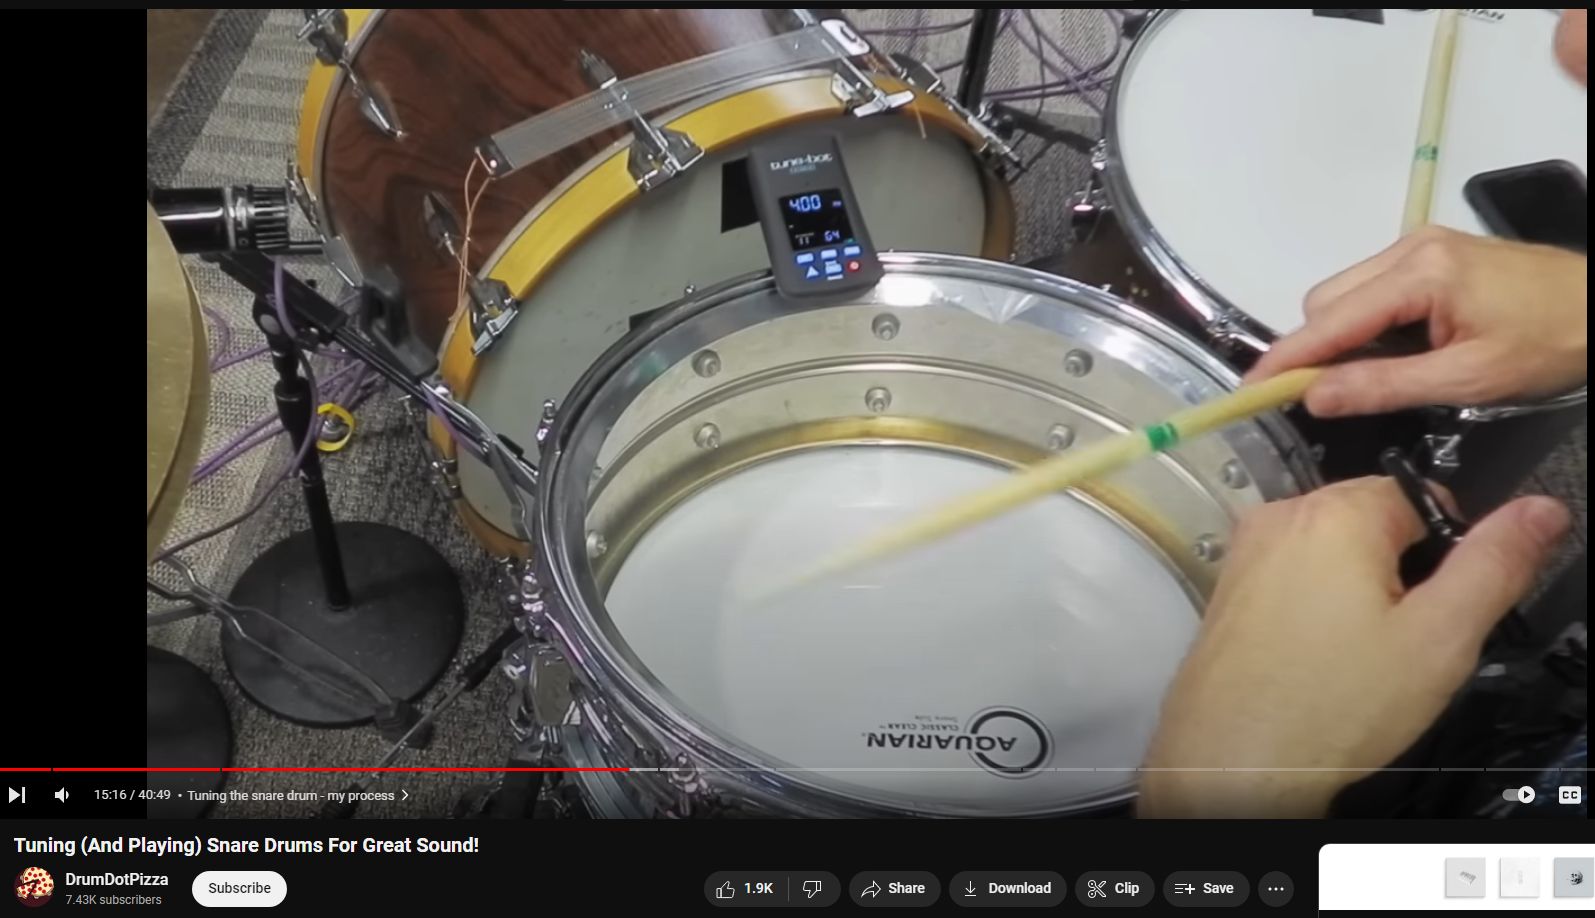
Link to the useful TUNE BOT and similar on amazon – It’s a rim clip-on tuner that senses and displays the fundament tone. Holding down the filter key sets the tuner into “high-mode” which allows its operation to exceed 400 Hz (up to 450 Hz).
0:00 Introduction
2:20 Broad drum tuning principles
6:06 Tuning the snare drum – my process
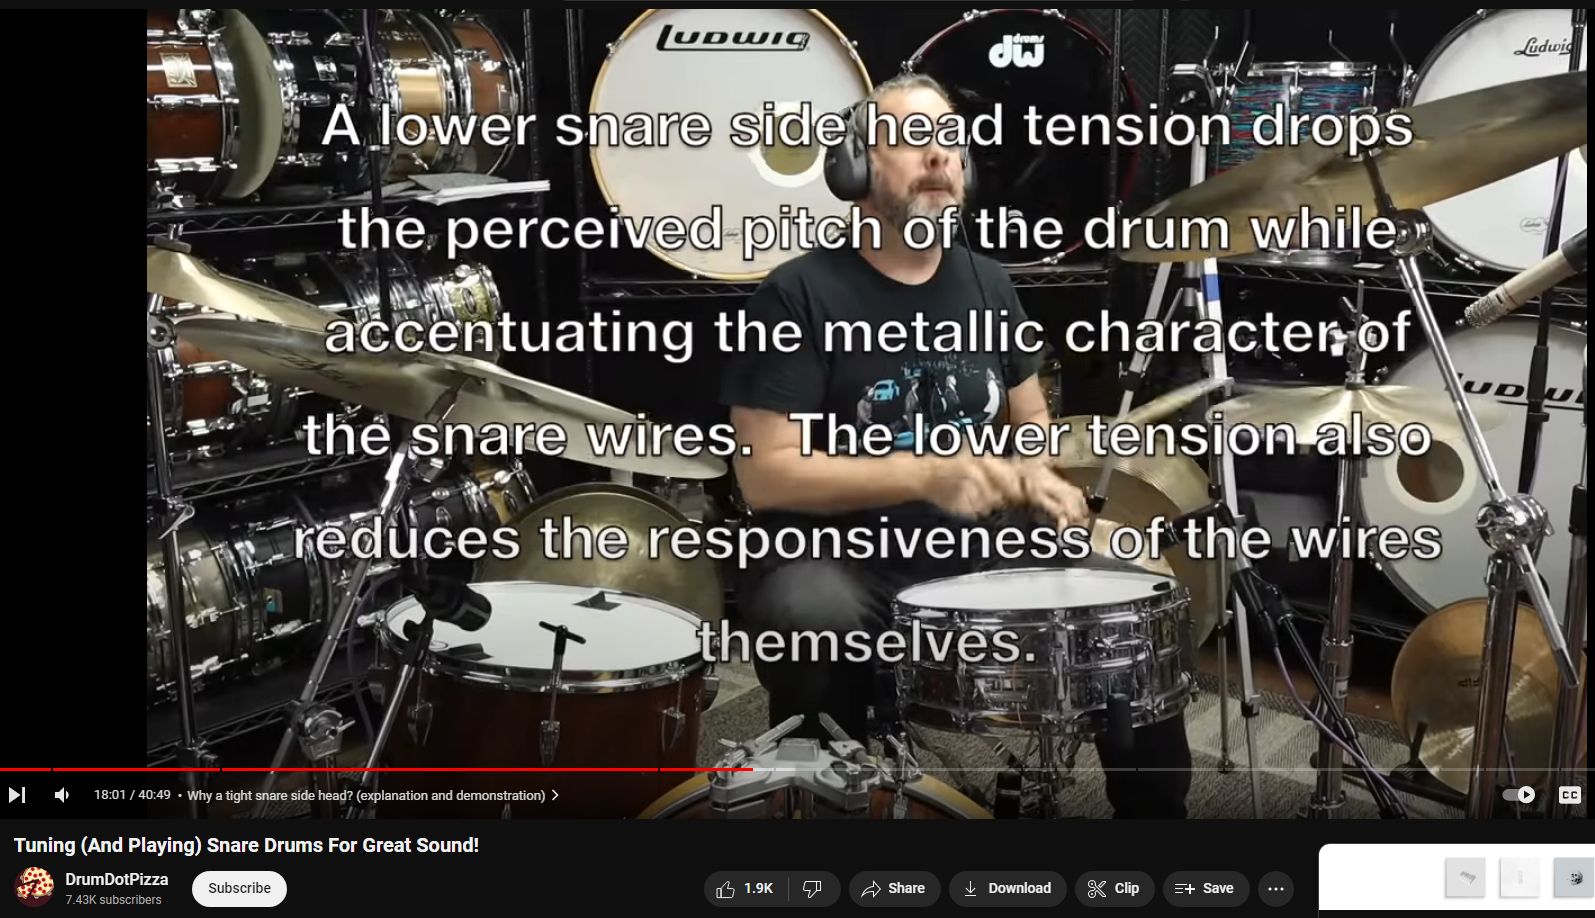
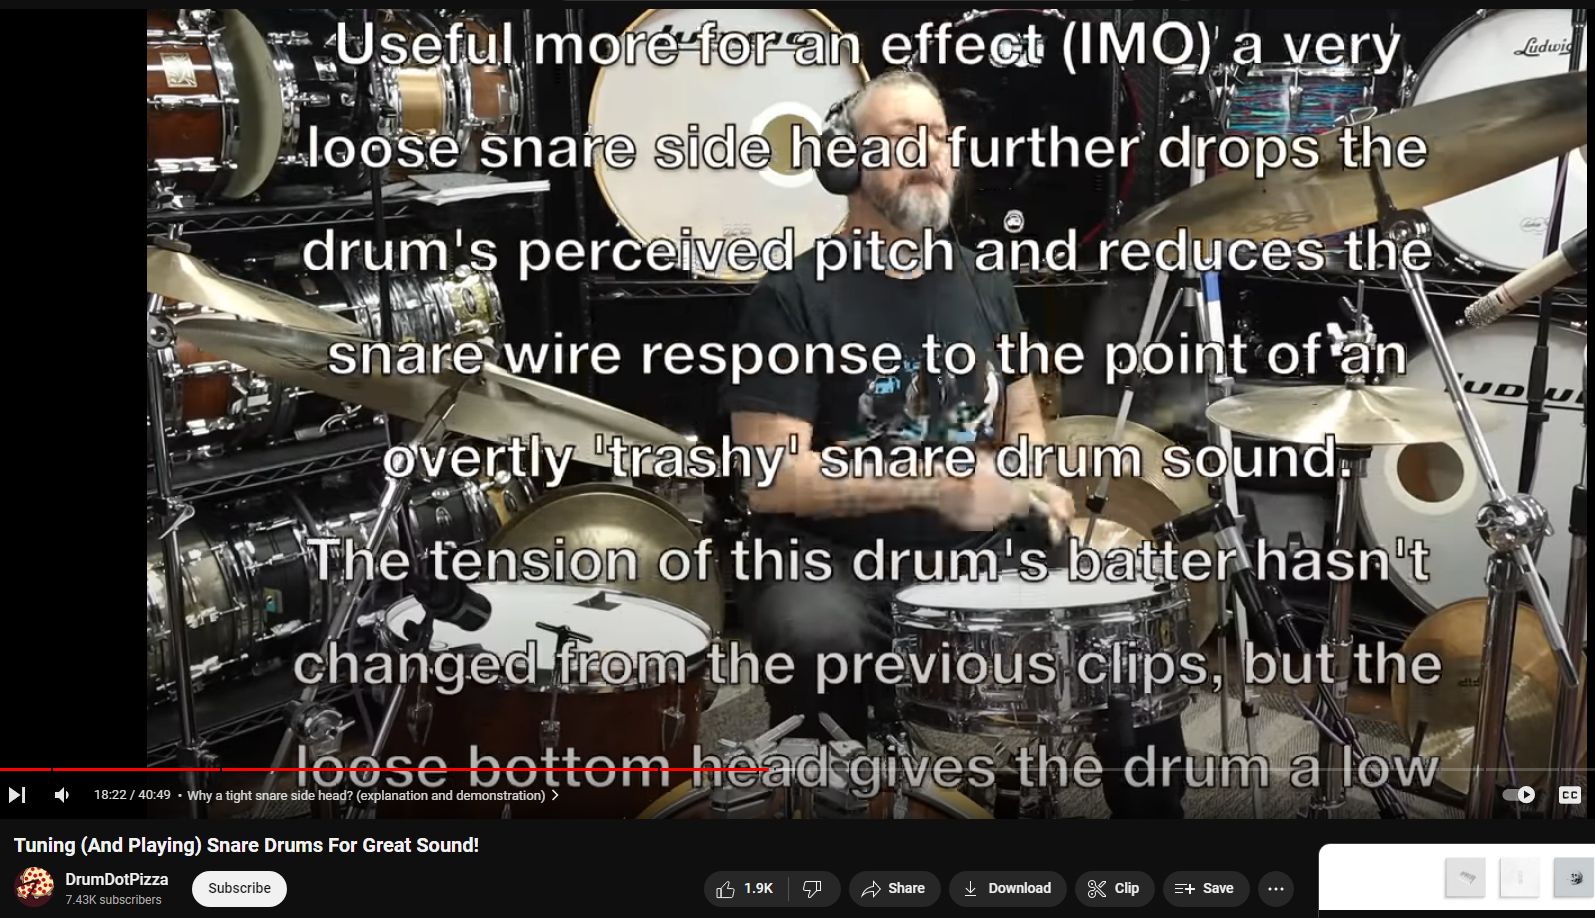
15:55 Why a tight snare side head? (explanation and demonstration)
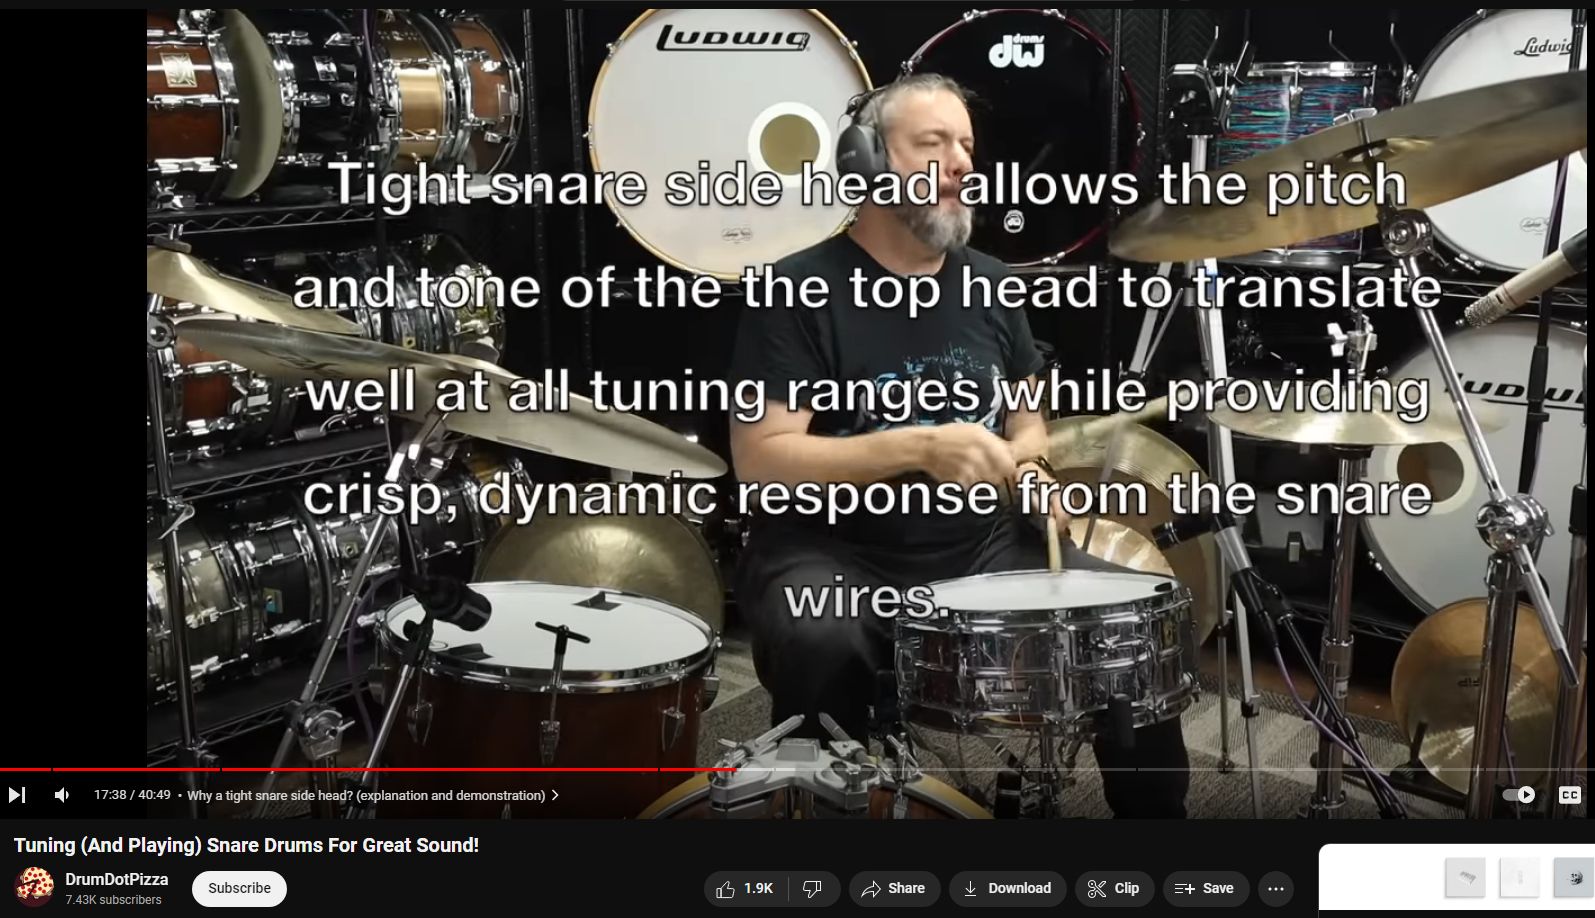
17:00 in — clip comparison — tight reso at ~ 400Hz, then down half-turn all lugs, then down half-turn all lugs — good comparison of effect of lowering reso pitch.
18:30 Attaching snare wires (and getting them straight!)
24:00 How my initial tuning sounds (audio example)
24:44 My heads and muffling in this example
25:34 People use too much muffling (drums sound different miked)
26:27 How mics hear drums differently than our ears
28:22 My main variation to ‘normal’ tuning (and why…)
33:12 Alternate tunings only for flexible hoops (NOT cast hoops)
34:10 About snare wire tension
35:48 One more thing — THE REAL MAGIC TO THE RIGHT SOUND!
Tuning Snare Sound
Tuning a snare drum is an essential skill for drummers, as it significantly affects the drum’s sound and responsiveness. Proper tuning can enhance a drum’s performance, fitting it into a wide range of musical contexts. Here’s a basic guide to snare drum tuning that can help both beginners and experienced drummers:
Tools You’ll Need
– A drum key
– A tuner (optional, for more precise tuning)
Steps to Tune a Snare Drum
1. Start with the Bottom (Snare Side) Head
– **Loosen and Remove the Snare Wires**: Before tuning, ensure the snare wires are loosened or completely removed to avoid interference while tuning the resonant (snare side) head.
– Even Tension: Using your drum key, slightly loosen all the tension rods around the drum to start from a “neutral” point. Then, tighten each rod by turning it a couple of turns, ensuring each rod is tightened with approximately the same amount of tension. The goal is to have even tension across the head.
– Fine Tuning: Tap near each tension rod with a drumstick and listen to the pitch. Adjust each rod until the pitch sounds even all around the drum. The snare side head should be relatively tight since a tighter resonant head produces a more responsive and sensitive snare sound.
2. Tune the Batter (Top) Head
– Even Tension Start: Similar to the resonant head, start by ensuring all tension rods are slightly loose, then tighten each one evenly, a few turns at a time.
– Adjust to Desired Pitch: The batter head’s tuning depends on your desired sound. A tighter tuning results in a higher pitch and more rebound, which is great for fast, articulate playing. A looser tuning gives a deeper, fatter sound. Again, tap near each tension rod to ensure even pitch all around the head.
– Personal Preference: There’s a lot of personal preference involved in tuning the batter head. Experiment with different tensions to find the sound that suits your style or the requirements of the music you’re playing.
3. Reattach and Adjust Snare Wires
– Reattach Snare Wires: Once you’re satisfied with the tuning of both heads, reattach the snare wires if you removed them.
– Adjust Snare Wire Tension: The tension of the snare wires can drastically affect the sound. Too tight, and the drum will sound choked; too loose, and the snares will buzz excessively. Adjust the strainer until you find a balance that provides a crisp, articulate snare response without excessive buzzing.
Additional Tips
– Listen to the Drum in Context: After tuning, play the drum within the context of your kit or with music to see how it blends. You might need to make further adjustments based on how it sounds in a full setup.
– Use Dampening if Needed: If you’re experiencing unwanted overtones or ring, consider using dampening techniques like moongels, drum rings, or even a small piece of tape. Be careful not to over-dampen, as it can kill the drum’s natural tone.
– Maintain Your Drum: Regularly check your drum’s hardware and heads for wear and tear. Changing worn heads and ensuring that the hardware is in good condition can significantly improve your drum’s sound.
Tuning a snare drum, like any aspect of drumming, is both an art and a science. It requires patience, practice, and a good ear. Experiment with different tunings to discover the range of sounds your snare drum can produce and how it can best serve your music.
“This is probably THE best snare tuning video on Youtube and I’ve watched a bunch of them. I’ve been playing drums for nearly 50 years and have tuned my snare this way for the past 10-15 years. Your explanation is right on target. You can really tell that you’ve been playing for quite a while and I also appreciate that you are an engineer as well and you are always thinking how the drums will sound when they have microphones involved for recording or live sound…”
“Thank you so much for that display of snare side head at 440 (A) hertz versus just a tad lower. I’ve only seen the phrase “table top tight” before which to different people mean different things. This video and that demonstration dared me take my own drum into for me unknown territory, putting the snare side to A, and batter side close, to F#. The snare sounds wicked. High in pitch, but wicked.”
“I have spent years trying to explain to drummers and non-drummers the reasons why you don’t need to muffle your drums to extremes. Maybe a piece of tape or one gel on a particulary noisy tom, but that’s it. There is more than one sound to a drum and if you muffle the crap out of them your drums sound dead in the mix- live and in the studio. The best producers/engineers/soundmen know this and let my drums sing! Great video! Thanks.”
“There is a school of thought suggesting that drums are usually over-muffled subconsciously to deaden their lousy tone from ill tuning!”
“Tuning with cast hoops is a much different experience than tuning with light hoops. You can very easily choke the hell out of a drum using the die cast. Believe me, I know. Edit: Excellent! you have a cast hoop video, gonna watch that next.”
“agreed – also note the 2.3 mm tripled-flanged is offered in a thinner-weight metal for even more resonance!”
“it is a good trick to detune the two lugs.. just be aware that this makes the drum a lot more sensitive to where you hit the head.. if you get off center by more than 1” it will produce more overtones that are a bit “off”.. can be cool… just something to be aware off. Cool video!”
“This is precisely one goal — imagine a dimpled steel drums, where there are 12 or more tonal ‘sweet spots’ all over the head — Mix In Some Black Magick into the artistry! I’ve found that detuning two (sometime three) lugs but not adjacent to each other gives zones having an even comparatively deader and livelier tang. It’s all about that tang.”
Super revelatory at around 31:00 in is the comparison of near-field drum mic tone/pickup to room/camera pickup/tone. The room actually sounds better. Many engineers mix feeds from various kit and room mics for this reason. MEN AT WORK got their infamous tone from a moderately-distant mic “coupled” to the kit via hanging blanket — like a “sound tent” or tunnel, with side effect of having fabric/softened tone mixed with hard floor reflections.
“Wait until you figure out to start changing the rubber material on the three stand thongs touching the drum (think of the “insanity” of wood-tip sticks actually sounding remarkably different from plastic-tip sticks!)…or to put sorbothane under the stand’s feet…or to have a resonant cavity under a small wooden stage lift…or that all those other resonant drums in your room are adding both goodness and badness that depends on head/ear location and also mic placement … and on and on…”