A DIY Tunable Pickup: Any sound, one pickup

A guitar pickup is a device used to capture the sound of vibrating guitar strings and convert it into an electrical signal that can be amplified and heard through a guitar amplifier or recording equipment. Pickups are an essential component of electric and electric-acoustic guitars, as they play a crucial role in shaping the instrument’s tone and sound.

Here are the key components and functions of a guitar pickup:

1. **Coil of Wire**: The primary component of a guitar pickup is a coil of wire wound around a magnet or magnets. When the guitar strings vibrate above the pickup, they create a magnetic field that induces a small electrical current in the coil of wire.

2. **Magnet**: The magnet(s) inside the pickup creates a magnetic field that interacts with the magnetic properties of the guitar strings. This interaction causes the strings to generate an electrical current in the coil of wire as they vibrate.

3. **Pole Pieces**: Many pickups have individual magnetic pole pieces located beneath each string. These pole pieces help to focus the magnetic field and capture the vibrations of each individual string more accurately.

4. **Output Leads**: The electrical signal generated by the pickup is carried through output leads, typically connected to the guitar’s output jack. From there, the signal can be routed to an amplifier or other audio equipment for further processing and amplification.

Guitar pickups come in several different types, each with its own unique characteristics and tonal qualities. The most common types of guitar pickups include:

– **Single-Coil Pickups**: These pickups consist of a single coil of wire wrapped around magnets. Single-coil pickups are known for their bright, clear sound and distinctive “twang.” They are commonly found on guitars such as Fender Stratocasters and Telecasters.

– **Humbucker Pickups**: Humbucker pickups consist of two coils of wire wound in opposite directions and connected in series. They are designed to cancel out hum and noise, resulting in a smoother, warmer tone compared to single-coil pickups. Humbuckers are often associated with guitars such as Gibson Les Pauls and SGs.

– **P-90 Pickups**: P-90 pickups are a type of single-coil pickup with larger, wider coils and a higher output compared to traditional single-coil pickups. They offer a unique blend of clarity, warmth, and midrange punch, making them popular among players seeking a versatile tone.

– **Piezo Pickups**: Piezo pickups are often used in acoustic-electric guitars and produce a signal by detecting the vibrations of the guitar’s bridge or saddle. They offer a natural, acoustic-like sound and are commonly used for amplifying acoustic instruments onstage.

Overall, the type of pickup used in a guitar can have a significant impact on its tone, feel, and playability. Guitarists often experiment with different pickups to achieve their desired sound and expressiveness.


https://www.youtube.com/watch?v=9aojyjsl3MI


Cleanest pickup — start with flat, then modify electronically.


Response of the pickup looks like a resonant low-pass filter.


See also // In-depth videos on pickup construction (watch BOTH):
[Music]

let’s be honest for guitarists pickups are kind of like shoes for the

fashionista we’re always trying to pair the right pickup with the particular

instrument and the genre kind of like trying to pick the right pair of shoes to go with the right outfit for a

particular event there are all kinds of different pickups there are single coils

there’s different kinds of single coils there’s humbuckers there’s the lace Al lumatone there’s gold foils there are so

many different kinds but a lot of times it boils down to trying to find one that

sounds the way that we want it to sound for our particular instrument now there

have been some really cool developments in the commercial pickup world with things like the Fishman fluence pickup

system which allow you to have different voicings for the particular pickup and

if you go watch the video that fishmen did about the construction of it and everything it’s really quite cool but

those fishmen pickups as awesome as they are are still pretty expensive and you

only get two or three different voicings out of each pickup but what if I told

you that there was a pickup that you can build on your own that will allow you to

infinitely tune the sound of your pickup to whatever it is you want and in fact

you could even set it up so that you could change those voicings on the

Fly that’s what I’m going to be talking about today is a DIY pickup system that

uses parts that you can Source online pretty easily with a simple circuit that

will allow you to dial in the pickup sound exactly the way you want it you

can make it sound like a big fat overwound humbucker or you can make it sound like a super thin low wind single

coil to anything in between so stick around and I’ll talk about not only how

to do it but the wise as

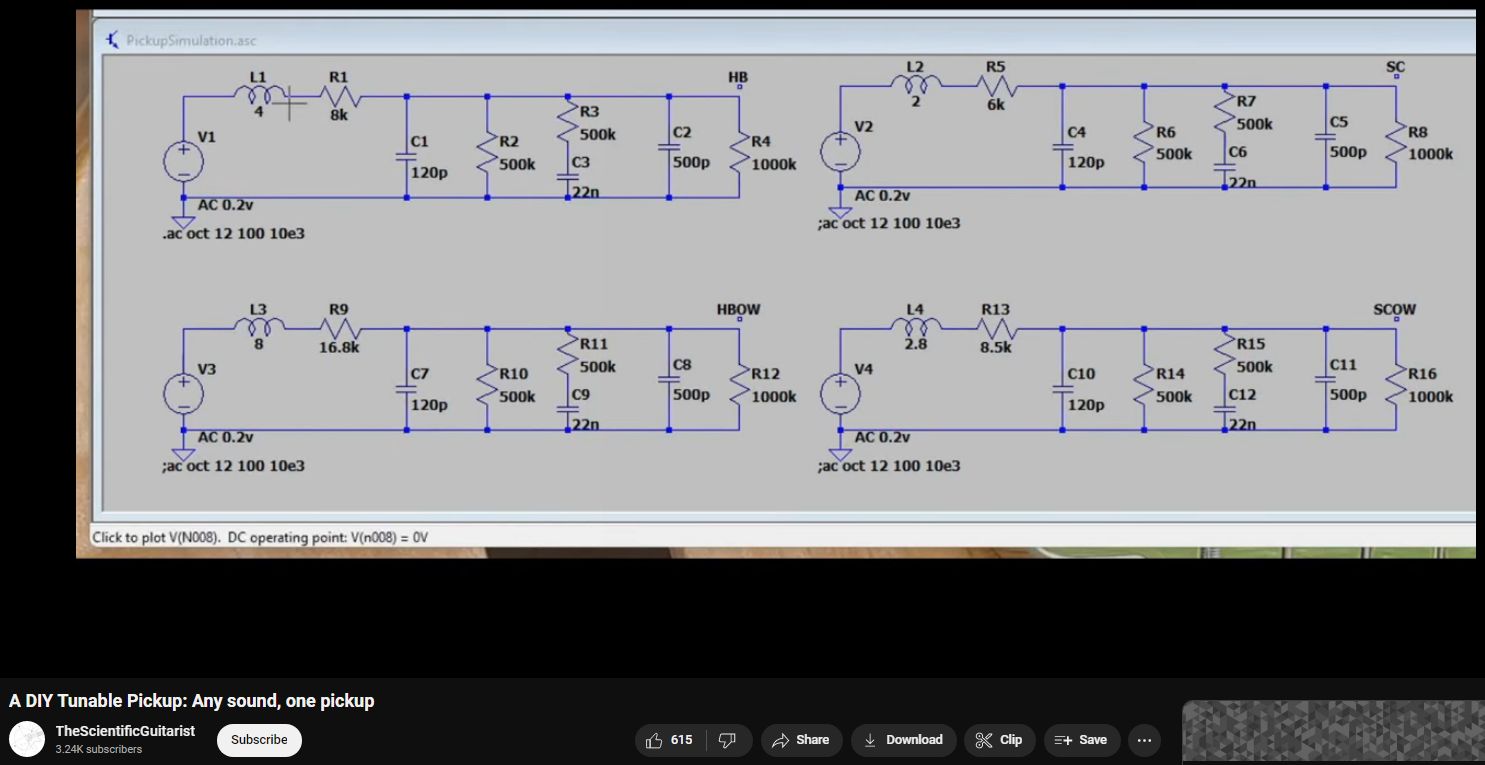
well so here I’m using LT spice which is a circuit simulator and in this

simulation I have got four different pickups that I’ve simulated that are

representative of the most common types of pickups out there and let’s just look at one of these this is for a regular

path style humbucker here and the representation for our pickup is that

being a coil of wire it not only has the resistance value which is what we’re

very used to seeing in all of the um specifications in advertising literature

but it also has an inductance and it has a small amount of capacitance that

occurs from having all of those windings of wies so close together so this

section right here L1 R1 C1 are the pickup itself but I’ve also put in our

volume potentiometer which right now this is volume is on Full and then our tone

potentiometer with our tone capacitor and right now with the way that it’s set up is that the tone is all the way up

and then we have a small amount of capacitance for our cable and then the input impedance of our amplifier input

or a pedal input right here and because we are never just

taking the pickup itself there’s always something else associated with it you

know at the very least a um a cable and the input to a pedal or an amplifier

even if we don’t have the onboard guitar controls but I’ve simulated all of this here and I’ve done it for for four

different pickups we have a humbucker we have an overwound humbucker

we have a single coil pickup a strat style single coil pickup and an overwound Strat style single coil pickup

and the thing that is different here is the inductance and the

resistance of each of the pickups the um inherent capacitance in each of these is

all basically the same and that actually comes from measurements um that that uh

some very dedicated people online have taken of pickups and found that

nominally between 100 and 130 picofarads is the typical um capacitance of a

pickup whether it is um a humbucker or a single coil but as you can see this

humbucker is a path style humbucker and it has an inductance of about four

henries that inductance is not just the coil but also the um the pole pieces

that run through the center of the coil they help um they help augment that

inductance and then we have our DC resistance here and so this is

characteristic of a typical path pickup this overwound pickup is actually has

the specifications for a Seymour Duncan JB style pickup um the single coil pickup has an

inductance of two Henry’s and a nominal DC resistance of 6 kiloohms which is

fairly typical of a vintage spec Strat style single coil pickup but then if we

were to go to a an overwound style Strat single coil pickup that inductance can

get up to about three Henry’s and you know 8 8 and 1 half sometimes even 9

kiloohms and so what I’ve done is I’ve actually simulated the AC response for

each of these four pickups here and the thing to note here is that

each of these responses is pretty flat through the low frequencies but starting

above about 1 khz it starts to rise until we hit a resonant frequency

because of the inductor and the capacitor in our equivalent circuit here

this creates a resonant second order low pass filter topology which means that

there is a point where the circuit hits a resonance and above that resonance it

rolls off at about 12 DB per octave and so if we look at our four curves here

this yellow curve here is our overwound humbucker which has the smallest rise in

its resonance and the lowest frequency at which that occurs that’s because the

inductance is so high that it has pushed that resonant frequency down and because

there’s so much DC resistance here it actually takes that resonant Peak and it

kind of smushes it out it doesn’t allow for a really sharp Peak to develop and then this blue curve here is

our regular humbucker the red curve is our regular is our overwound single coil

sorry this is the overwound single coil and then this final curve is for our

vintage single coil pickup and you’ll notice that it has the lowest

resistance and inductance which means that the resonant frequency gets pushed

way up and its resonant Peak reaches a higher amplitude and has a sharper Q

factor to it okay and so these plots actually describe a lot of what it is

that we hear as the differences between pickups okay we talk about how a vintage

style strap pickup is really clean and you know has lots of trouble and is you

know we may use terms like jangly or chimy or whatever it may be and it’s

that we’re hearing lots of this upper frequency content where the human ear is

really sensitive and we perceive that content as being um as being jangly or

chimy or having a lot of um high frequency bite or whatever it is and

down here we with an overwound

humbucker we actually are rolling off a lot more of the highs there isn’t that really sharp resonant response um and so

we perceive the output to be mellower now the one thing that the

simulation is not showing is the actual difference in absolute voltage okay this

is just a normalized response um a a normalized frequency

response just so that we can compare these resonant characteristics across each of them so

when we’re going cycling through all of these different pickups what we’re really doing is is we’re going through

trying to find a combination of resonant frequency the Q of that of that resonant

Peak and the cutof frequency of that resonant Peak so we

can think of it as essentially trying to choose a parametric a single band parametric

EQ that is pleasing to us to work with the instrument and to work with our

amplifier and everything so if we want to make a

pickup that will allow us to get any of these voicings then one thing we can do

is create a is to First create a coil that is not going to get rid of any of

this high frequency information if we can start with a coil that is going to

be super super flat then we can use Active Electronics to boost the region

that we’re interested in and roll off the high frequencies above that region

so I’ve actually here got simulated a a

um coil that has very low inductance so 0.1 Henry’s and only 2 ohms and a very

small small amount of capacitance because we’re using very little wire and

then we still have um we we’ve got the

other components here but I’ve set them to really high values because what we end up having to do with this is we end

up having to buffer it which I will talk about later but these measurements for

these parameters here actually are the parameters for um for the tunable pickup

that uh we’re going to see a little later in this video and so if we were to look at the response here we get this

purple line that is really really flat you can see that going all the way up to

uh 10 khz we get a change of you know something around 1 DB so very very

little change in response so what this does is it gives us a clean pallet to

start with in fact if you were to hear just this coil without any kind of

filtering on it it it sounds pretty harsh because there’s so much higher

frequency content up here the other pickups don’t reproduce but this allows

us to be able to apply filters to it so that we can recreate any of these

responses that we want and even you know ones in between so that we can create anything from a tonality of the most

overwhel humbucker all the way up to the most pristine almost ice picky single

coil pickup okay so that is what we’re going

to be shooting for and then what we will do is we’ll pair that with some Active Electronics to do the

filtering one of the benefits of doing this as well is that we can also start

introducing um different Equalization for things that we can’t even achieve phys physically if we wanted to or we

can do things where we can introduce more advanced filtering to make it sound

more like an acoustic guitar for example and um that’s going to be a little bit

outside of the scope of what I’m going to be talking about here but it is

certainly possible to to do that so if we take a look at these

curves we we have already discussed how it’s as if we have some kind of a

parametric Peak here and then a low pass filter above that Peak and so now what

I’m going to show you is a schematic that I came up with for a circuit that takes the input from a very low

inductance low resistance coil which is going to have a really wide bandwidth and allows us to filter it in such a way

that we can get a really wide variety of tones out of it

so this particular circuit is actually pretty straightforward it’s four opamp

stages um this first opamp stage here is just a Unity gain buffer and that buffer

is used to provide a high input impedance so that we can take the output

from our coil and not have any losses um or very little losses by

virtue of buffering the signal and then what we do with this second opamp stage here is this is actually a

second order Salon key low pass filter so this is going to provide that 12 DB

per octave rolloff that we want and this potentiometer right here is going to set

where that frequency is the values that I’ve chosen here will give us a low will

give us a corner frequency between about 2 khz and 4 and a half or 5 khz which

covers kind of that whole range from overwound humbucker all the way to

underwound single coil pickup and if you want to learn more about the salon key

filter topology there’s lots of good articles online that you can go read about next up is we are actually using

these final two op amp stages to create a fully parametric single band a single

band fully parametric equalizer here so we have a potentiometer that is going to

control the gain of our Peak or the amplitude of our resonant Peak and then

using a gyrator or a simulated inductor here we can set the que of that with

this potentiometer which is how wide our resonant Peak is and then we can also set the

frequency of that resonant Peak as well and so that allows us to

um move that resonant Peak up really really high if we want a really kind of sparkly clean tone um or we can move it

way down to uh you know around the 2 khz range to be much more like a very

overwhel humbucker and then on the output of that parametric equalizer we just have this

output capacitor which is going to block DC voltage out and then we have a volume

potentiometer and the only other thing that we have here is a reference voltage that we use

for biasing our op amp stages um so that we can make sure that

we get enough signal swing now another thing to note is that

this is maybe a little more complex than is necessary to achieve what we need

because I mentioned that the response of the pickup looks very much like a

resonance low pass filter well you can actually achieve a resonant low pass

filter using a single opamp stage so you could have a buffer and a resonant low

pass filter the only issue there is that with that Resident low pass filter it

can be a lot harder to dial in exactly the cut off frequencies and the Q and

the gain of that resonant Peak it’s there’s a very narrow operating range

for resistances to allow you to do that it’s certainly possible and I actually

have another circuit that I’m experimenting with right now that will allow me to use just four op my my same

four opamps but will allow me to use allow me to get two or three different

voicings from a single quad opamp package

here but this is really all that we need to do when where for example if we

wanted something to sound like a an overwound single coil for example we

would have our low pass filter be a little bit less than our maximum cutof frequency we would have our gain set

somewhere maybe like 50% perhaps the Q would be less than maximum probably

somewhere around the 50 to 60% Mark and the frequency would be at around the 3/4

Mark and what that would do is that would essentially mimic this red line

that we have here where we don’t have quite as much resonant Peak gain as a

regular single coil and we’re not quite as high in frequency but we have a much higher low

pass filter cut off than either of the humbuckers here and so it would create

we could use that to create kind of this sort of response and there will be some sound samples a little later um about

that so I mentioned how this pickup is easy to build on your own and I wanted

to show you um just what exactly goes into building the pickup itself and it

is really quite simple as we all know a pickup is just a coil of wire around

some magnets and this pickup is actually going going to be really just the same

thing so this particular design is going to use two coils of wire and I’ve got

these coils here they have some metal slugs here in the middle that are just this is just mild steel um that is made

to fit inside of this bobin and I have wound this with some

wire that is significantly thicker than typical pickup wire typical pickup wire wire is around 42 gauge Magnet Wire but

this here is 28 gauge Magnet Wire which is significantly thicker you can see

that uh you know it you you can actually see it for one it’s not like the thickness of a human hair um the thing

about thicker gauge wire is that it also has less resistance per meter meaning

that we will have less of that ser resistance from our schematic that is um

going to make it so that we don’t have quite so much

um so that we don’t have quite so much of the damping due to the resistance so that means it’s going to preserve more

of those high frequencies that we need in order to be able to shape it to what we want and so we have two coils here

and these coils get attached to a b base plate and I’ve got two different styles of base plate that I’ve made um one is

single coil and one is humbucker sized there’s no real difference between these

um it’s simply form factor for what fits in the routing of your guitar or your

pick guard um I have used both I tend to use the humbucker sized one just because

I tend to Route humbucker cavities more than I route single coil but inside they’re both exactly the same

and you see that I’ve got these white rectangles that I’ve put on my base

plates and that’s for my magnets now these magnets are not typical pickup

magnets these are neodymium magnets the ones that I have here

are/ in by 1 in by an e/ in thick n52 that’s the grade of the magnet um you

want the really strong magnet because that’s going to to create a stronger magnetic field which means

that you will be able to get a stronger signal and the way that we’re going to

assemble all of this is that we are going to do revers wound reverse

polarity of these two coils but they’re going to be wired in parallel if you’ve

ever wired a humbucker in parallel as opposed to in series

you you will have heard that instead of having that really big F sound that we’re used to with a humbucker it’s a

little bit of a thinner sound and that’s because it’s keeping more of those high frequencies because you are actually

reducing the overall um the the overall inductance

and resistance of the pickup because resistances in parallel divide each

other as opposed to adding together in series so in order to make sure that our

magnets are opposite polarity we just make sure that they stick together

okay and I actually have a video a pair of videos for um assembling these as a

sustainer driver that goes into a whole lot more depth and I will link those in the description but we make sure that

they stick together on the side because these neodymium magnets are magnetized through their face as opposed to a

typical guitar magnet which is magnetized through its Edge and we glue these down onto the base plate inside

those rectangles do it one at a time so they don’t snap together but you glue them down with super glue um until

they’re all until they’re all set and everything and then they won’t slide together and stick like that and then

you put the coils on top of the magnets and it’s simply a matter of feeding the

wires of the uh coils into the base plate and solder ing them because if you

take two coils wound the same way um and you and you wire the the starts and the

ends together the way that this base plate is that means that it’ll put it in parallel and they’re connected to um the

pads for our lead wire so you know you’re Stack Up In the

End whoops bumped the camera Stack Up In the End will look something like this

okay and then you just put a cover over the top of these um you you’ll see in

the demo that’s upcoming that um the cover that I have made has these slanted

pieces of Steel that go over the top of these slugs and that just helps Bridge the magnetic Gap that’s going to exist

between these two slugs here um so that you don’t lose your so that you don’t

get a dip in output signal strength um when you bend your strings or if you have an odd number of strings or what

have you but the coils and the base plate are only part of the equation

because you’ll remember that these are very low wind and low inductance and low

resistance which means it’s going to be very low output but what we’re going to

do is we’re going to use a Transformer to step that signal up now the reason we

use a Transformer is because the voltage gain that you can

get out of a transformer can be very very clean if you use a good Transformer

and that means that instead of doing all of the gain with Active Electronics

where we would be amplifying any kind of thermal noise in our components or um

you know having to use several stages to boost it up we can use just a single Transformer now this Transformer here is

a um I think this is just a zyon Transformer that I got from Mouser the thing that you want to look for in a

Transformer is a high winding ratio where one side is very very low and the

other is really high so this has an 8 ohm primary and it has um I think it’s

either 12200 or500 Ohms on the secondary um and the way that

Transformers work is that your voltage gain goes as the um I think it’s that it

goes as the square root of the winding ratio which I’ll have to I’ll have to

look that up I don’t remember offand but when you have the secondary have a lot

more winds than the primary that means you’re going to step up your voltage a lot more okay now while this Transformer

works there are a couple couple things about Transformers that I just want to mention and one is that if you go with a

really cheap Transformer then the core material in there that’s my soldering

iron beeping the core material can saturate and it can introduce distortions that we really don’t want

and the other comes down to size while this is a relatively compact Transformer

it’s not all that big um there is another Transformer that I greatly

prefer that is significantly smaller you can see how small this guy is compared

to the other one this is a Triad Transformer it’s a military spec um

audio Transformer that has the same winding ratio and same P same impedances as this

zyon one but it has been made in a much smaller much more

robust um package here now with that comes a

big difference in cost this one was $3 or $4 I think the zon one and the Triad

one is about $18 however the cost of the magnets

depending on where you get them are is a doll or two a piece the bobbins can be 3D printed the wire is relatively

inexpensive like all Magnet Wire you can get just because we’re not using very much you can just get like a little 4 o

uh spool of wire and then this is just 1018 M Steel in here that I cut down to

fit inside the bobin and so the the cost allog together including the $18

transformer for all of this is really only about $25 per

pickup um I’m not going to get into all the finer details of the construction of

it um the other videos that I’ll link to really get into that but I wanted to show you the pieces of what go into

this [Music]

[Music] [Applause] [Music]

so there we go hopefully you found that useful and enjoyable and hopefully you have seen just how easy it can be to

make your own pickup that will allow you to get a really wide range of sounds without having to go through the hassle

of pulling out pickups and rewiring them and everything over and over um if you

are interested in making one for yourself I have put link below to all of the files that include the bobin files

and the schematics and um everything else that you’re going to need to be able to put one of these together for

yourself so have at it take care and we’ll see you next [Music]

time

1 thought on “A DIY Tunable Pickup: Any sound, one pickup”

Leave a Comment